
Are you looking for Dolby Atmos apk installation guide? Then just keep reading, in this tutorial, I have explained simple methods to install Dolby Atmos on Android phones. All of us listen to our favorite music on smartphones while working, jogging or in the free time.
Even most of us love watching movies on our smartphones. There is something called Dolby Atmos surround which can take our music experience to the next level.
Do you know that Dolby digital surround technology is now available for our Android devices? Yes, we can download and install Dolby Atmos on Android with or without root. Before we start installing Dolby digital audio, let’s learn about it.
Also Read:
Know About Dolby Atmos Sound.
Well, Dolby Atmos is the next-generation surround sound technology. Dolby Laboratories first announced the Dolby Atmos in April 2012 and released it in June 2012. You may also love must have root apps for rooted phones.

Digital Dolby Atmos first introduced in cinemas later on it became possible to get it on SmartPhones and other Android devices as well.
Dolby Theater in Hollywood, California was the first to get Dolby Atmos surround setup.
Famous movies like Batman vs Superman, Star Wars used Dolby Digital Atmos surround sound.
Dolby surrounded cinemas have up to 64 speakers placed in various directions to create a 3D surround sound effect.
With the advancement of technology, Dolby Atmos became available for Android devices. Lenovo A7000 was the first smartphone to get Dolby Atmos technology.
Android developers ported Dolby Atmos from Lenovo A7000 to provide it to all Android devices. I have also shared best music downloader apps for Android.
How To Install Dolby Atmos On Android phones?
Well, currently only a few devices come with preinstalled Dolby Atmos. But don’t worry after the end of this guide you will get Dolby Atmos on your Android device.
There are two ways to install Dolby Atmos on Android devices. The first way will not require a rooted phone while trying the second way it will ask for root access.
If you have a Non-Rooted Android device, then you can get Dolby Atmos after installing Dolby Apk. If you have a Rooted phone, then you can install Dolby Atmos on Android by flashing a zip file.
Must Read:
Method-1: Install Dolby Atmos On Android Without Root
Requirements:
- Android phone (No Root Required).
- Google Play Music app.
- Dolby Atmos Apk.
- A cup of coffee (As you like).
Don’t want to root your android phone? Want to experience 3D surround sound? Get ready for a pleasant listening experience on your Android phone.
The first method is the simplest way to install Dolby Atmos on android without root. You need to download Dolby Atmos apk and do some tweaks in settings. So let’s dive into the tricky part of this method.
Steps to install Dolby Atmos on Android phone without root.
Step- 1:
Download and install Dolby Atmos apk (without recovery) on your Android device. Before installing it make sure you have enabled the unknown sources installation option from settings.
Step- 2:
Reboot your Android phone after Dolby Atmos apk installed successfully. Don’t open the app yet; you need to follow more steps.
Step- 3:
Install Google Play Music app from play store (Skip it if already installed). Only Google play music will work so don’t try other music apps like Spotify Premium.
Step- 4:
Disable the default equalizer of your Android phone. You should do this to neglect unfortunately stopped the error. The default equalizer can be found in settings, or you can find it in Google play music.
Step- 5:
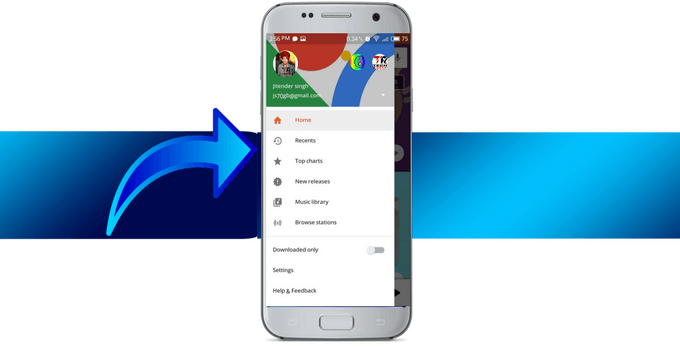
Open the Google Play Music app and click on three horizontal lines in the upper left corner.
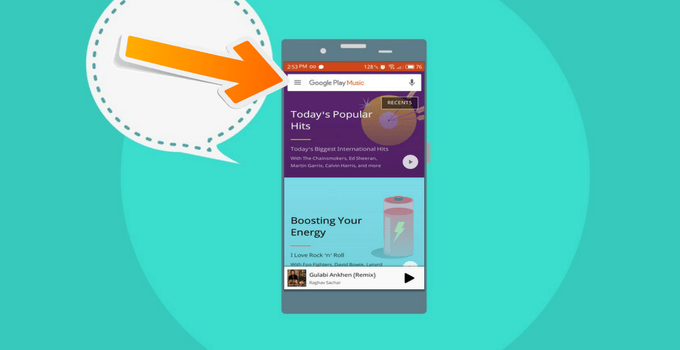
Step- 6:
Click on the settings in the play music navigation and scroll down.
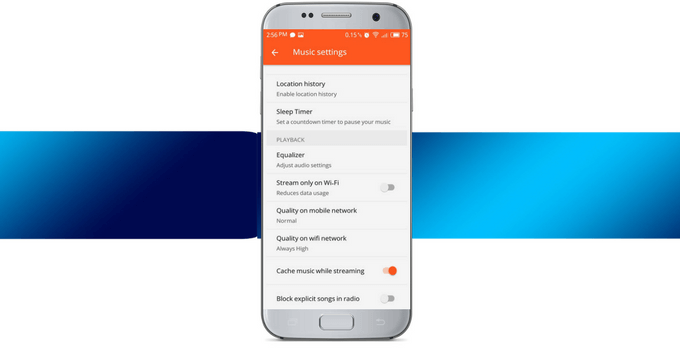
Step- 7:
Navigate to the equalizer and open it now enable Dolby Atmos from there. Most of the time it will be activated automatically.
Step- 8:
Go back to the music library and play any song. You can turn off the Dolby Atmos apk and test the sound before and after installation.
Boom you have successfully got Dolby Digital Plus effects. Use headphones for a better experience.
Important Note: To be honest you will not get the real Dolby Atmos effects without root. In this way, you can only get Dolby Digital Equalizer which will only work with Google Play Music. It is a must to disable the default equalizer on your device.
Must Read:
Method-2: Install Dolby Atmos On Android With Root
Below I have given the step by step instructions for installing Dolby Atmos on rooted Android phones.
Requirements:
- Rooted Android phone must be running on JellyBean 4.3 or above.
- Unlocked Bootloader.
- Custom Recovery installed (Twrp is preferred).
- Dolby Atmos Zip file.
- You must have proper knowledge of root, bootloader, custom recovery.
Do you want the heavenly feel while listening to your favorite music?
Well, take a long breath because you are going to achieve that feel. As you have learned that installing Dolby Atmos Apk without root will not give you the real Dolby sound mod.
So we need to flash Dolby Atmos zip file via custom recovery. It will enable the Digital audio mod in our phone’s whole Rom. So let’s give an injection of Dolby Audio to your phone.
Guide to Root: Root Android Without PC.
Steps to Install Dolby Atmos On Android via Custom Recovery.

Caution: If you don’t know about Root, unlocking OEM, or custom recovery then, please do not try this at all. Do some research before trying this method. Techonation or the author will not be held responsible for bricked devices, dead SD cards, or damaged devices.
Step- 1:
Download Dolby Atmos zip file on your Android phone. The zip file is for only a rooted device with custom recovery installed. TWRP recovery is preferred in this case.
Step- 2:
Backup your data (Recommended). You can use titanium backup, PC or any other backup option. In case something goes wrong you can recover your data that’s why backup is recommended.
Step- 3:
Now Power off the device and reboot to recovery mode (by holding power button with volume up or volume down at the same time). It depends on the device. You can search on Google your device name+ access recovery mode.
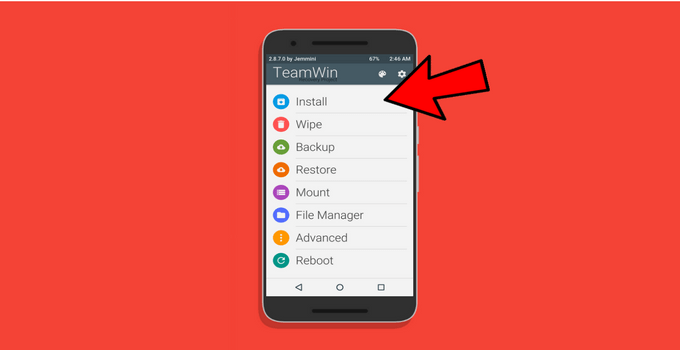
Step- 4:
Navigate to install and click on it. It is located on top of all buttons in TWRP recovery. If you are using Philz or CWM recovery, don’t worry process is same for all.
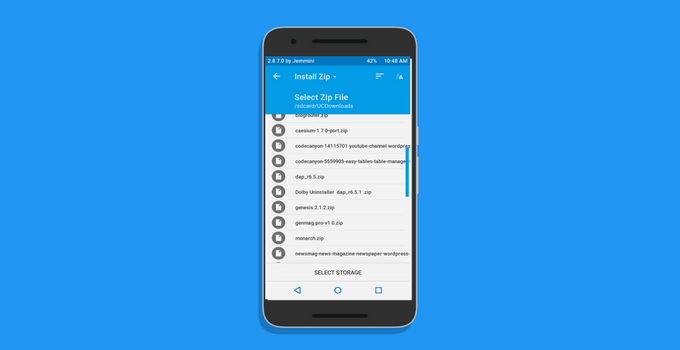
Step- 5:
Locate and click on the Dolby Atmos zip file. Well, you can find it in the folder where you have downloaded it. For UC browser it’s in UC downloads and for Chrome browser, it’s in the downloads folder.
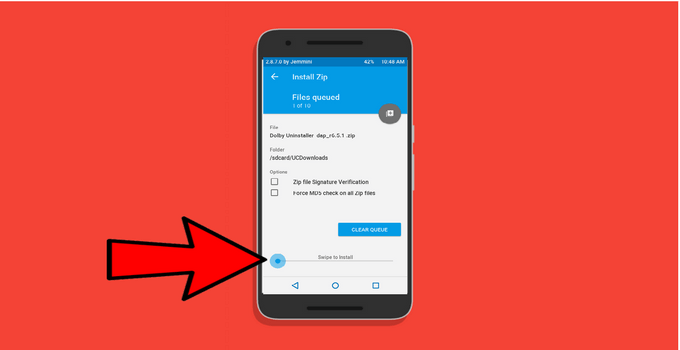
Step- 6:
Now it will ask to swipe to install just do it. Hold the big circle in the left corner and swipe it to the right side. (See below screenshot). Don’t check two option as seen in the screenshot.
Step-7:
Wait for few seconds, and it will show you successfully installed. If any error occurred let me know in comments I will help you to solve it.
Step- 8:
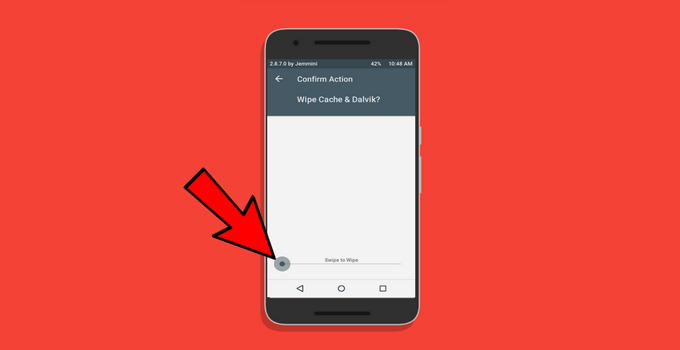
Then wipe cache and Dalvik cache. There is no need to wipe data or internal storage of the device. In case, you are facing errors then clear data as well.
Step- 9:
The final step, reboot your device and enjoy the Boom-Boom sound. Now you have successfully installed fully features Dolby Atmos app.

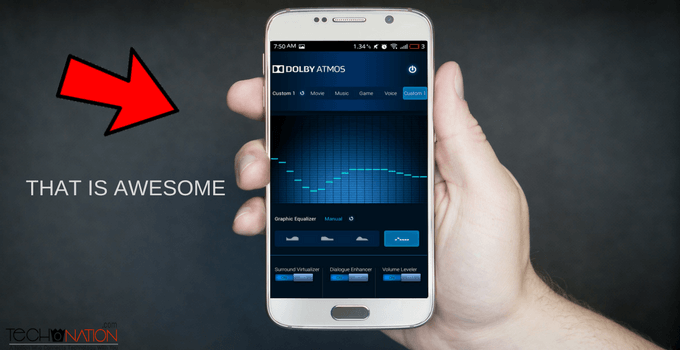
Step- 10:
Now you can adjust the sound from Dolby atmos app. For good bass and clarity, you can optimize the sound. Just keep trying different optimization to find out the best one.
Finally, you have successfully flashed Dolby Digital Atmos. You should use good quality headphones to enjoy the beats.
Important Note: Please make sure that your device’s bootloader is unlocked and it’s rooted with custom recovery installed. If anything bad happened comment below, I would help you.
Video Tutorial
Still, haven’t understood the step-by-step tutorial? Well, check out this video guide to install Dolby Atmos apk on Android devices. Watch the video until the end to understand the full process of installation. If still you are facing issues just comment below I am ready to help you out.
Video removed due to some issues.
Must Read: Best iOS Emulators For Windows.
How To Uninstall Dolby Atmos Apk From Android?
In case you want to uninstall Dolby Atmos from your phone then continue reading.
If you have just installed the Dolby digital apk using the first method then simply uninstall the apk. If you have flashed the Dolby Atmos zip file, then follow the below process.
Steps to uninstall Dolby Atmos from Android.
- Download Dolby Atmos uninstaller zip.
- Reboot to recovery mode.
- Flash the Dolby uninstaller zip in the same way you have flashed Dolby Atmos zip.
- Wipe cache and Dalvik cache then reboot your device.
- Now you have successfully uninstalled the Dolby surround Mod.
Note: That’s how you can remove Dolby digital atmos from your Android device. Well, if Dolby Atmos is giving any kind of error like “unfortunately stopped” then just uninstall it using this method and reinstall it.
There are also other sound mods like Dolby Atmos available on the internet. The best one among them is Viper4Android.
If you want a tutorial about how to install Viper4Android on Android, then let me know in the comments below. I’ll write a step by step guide on it as soon as possible.
You may also like- Change Fonts on Android without root
Conclusion:
Hope you have enjoyed this step by step tutorial to install Dolby Atmos on Android. I have used these methods on a bunch of devices, and it helped me to increase the sound on weak output devices.
If you find the post useful feel free to share with your friends. If you still have any questions or suggestions let me know by leaving a comment below.


I have followed all the steps carefully but no app is showing up after I flash the zip file. Can you help me out?
Go to the settings>Apps check there if the app is showing.
Bro i flashed dolby zip file several times with twrp recovery…after flashing, it doesn’t open…even i flashed it through flashfire….then installed as.apk + asUI.apk inside the zip file manually…..turned off system sound effects….turned off NUplayer in developer options…..but the issue is still there…plz help
When you try to open it what did you see?
Bro I flashed the installer zip and and rebooted the phone. I tried to open the Dolby app and it keeps crashing.
Go to the application settings and clear data of the Dolby app. Also, make sure your device is rooted!
Hello my phone is not rooted I follow all the steps but the google play music isn’t working anymore is there any way to install it…thanks in advance
You can download the Google play music from third party apk websites, it is not available on Play Store anymore.
Great guide! I followed the no-root method, and it worked flawlessly on my device. The sound quality has improved significantly. Thanks for sharing this step-by-step process!
Great post! I appreciate the detailed steps for both rooted and non-rooted installations. Can’t wait to try out Dolby Atmos on my Android device!
Great post! I really appreciated the step-by-step instructions for both rooted and non-rooted setups. It’s nice to see clear guidance for all Android users. Excited to enhance my audio experience with Dolby Atmos!